

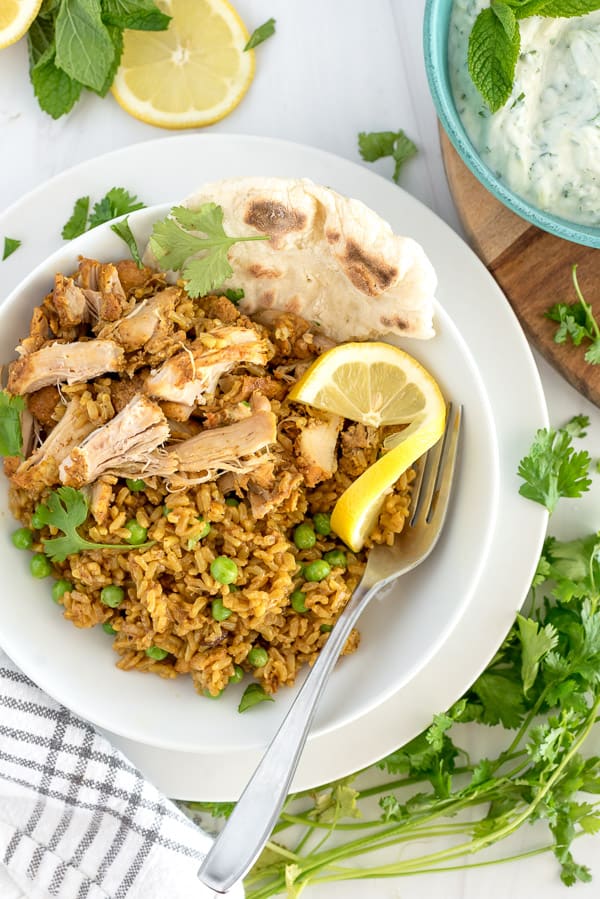
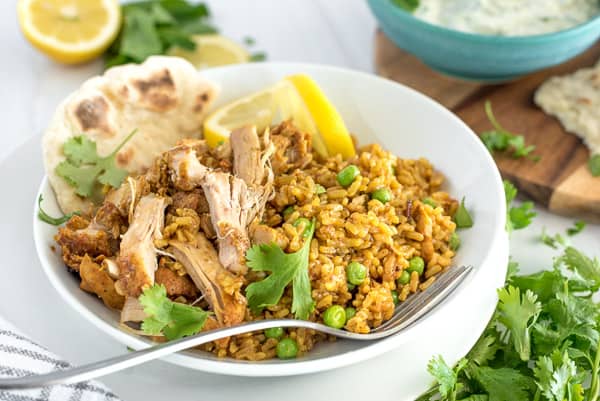
Vibrant spices and rich flavors make this easy Instant Pot Tandoori Chicken and Rice an absolute joy to eat! Add a pop of sweet peas and a creamy dollop of Raita and you have one seriously dreamy dinner!
Turn this meal into a freezer meal! Find this recipe in our new Freezer Meal cookbook. CLICK HERE
Let’s start with another “Marci Confession,” shall we?
I RARELY go to Indian restaurants. MAYBE once a year. My beloved Thai food restaurant would miss me, you see.
Don’t get me wrong, I adore the incredible smells and flavors of all those warm, bright spices, but time and time again, I leave feeling so sick.
Is everything deep-fried? Is it laden with preservatives? Did I eat the portion size equivalent to 3 large men?
The latter may be my problem . . .
So I’ve recently started playing with my favorite Indian dishes and really trying to nail the flavors without the stomach ache, AND TODAY’S RECIPE IS A TREAT!
I love this so dish so much that I made a personal request to MYSELF that I make it for ME on my birthday.
THAT’S A BIG DEAL
The chicken is marinated in yogurt and spices to ensure maximum flavor. Then it gets a quick browning in the pressure cooker pot (MORE FLAVOR!), where we then add the ingredients for coconut rice, and the whole thing cooks together in ONE POT! Love when that happens 🙂
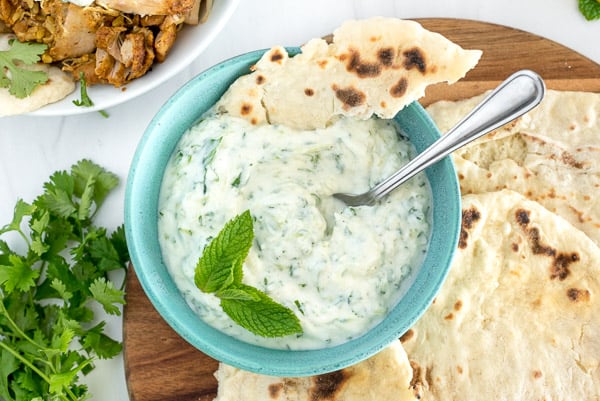
While the chicken and rice cook, I whip up my FAVORITE Indian condiment, Raita. It’s fresh and cool from the yogurt and cucumber, but also warm and earthy from the spices . . . it’s a delight to eat! Don’t skip it!
Once the chicken and rice are done, I shred the chicken and fluff the rice. At this point, you can stir the rice and chicken together, but I prefer to keep it separate so everyone gets the portion they want. Stir in some poppin’ green peas for sweetness and color and the most giant plop of Raita you can muster, and you have a dish worthy enough for a birthday celebration (as was my case).
This dish has my whole Indian food lovin’ heart, friends! I can’t wait for you to give it a go!
WHY YOU WILL LOVE INSTANT POT TANDOORI CHICKEN AND RICE
- ONE POT WONDER: Chicken, rice, and veggies all in one pot — music to Mama’s ears.
- INDIAN FLAVORS WITHOUT THE TAKEOUT: No need for takeout. Stay in your cozy pants because this dish is just as good as the restaurant version!
- FOOD HUG: You know that feeling you get when you take a bite of food, and your whole body feels a burst of joy/love/peace flow through you? That’s a food hug and this dish brings it 🙂
- FAMILY FRIENDLY: This dish brings the Indian flavors, but not in a “knock your palate out” spicy way. It’ll please all ages!
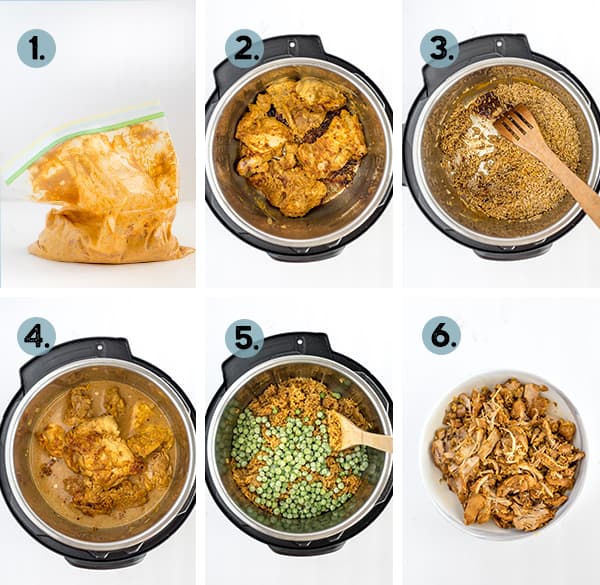
HOW TO MAKE THE BEST TANDOORI CHICKEN
- Add the chicken and marinade in a ziptop bag and let marinate for 6 hours
- Use the sauté feature on the pressure cooker to brown one side of the chicken
- Add the rice and a splash of broth and scrape up any browned bits off the bottom of the pot
- Add the broth and place chicken on top of rice; pressure cook
- Set the chicken aside and stir the peas into the rice
- Shred the chicken and serve!
SEE RECIPE CARD BELOW FOR DETAILED COOKING INSTRUCTIONS
TIPS FOR SUCCESS
- CHICKEN THIGHS VS BREASTS: I’m typically a chicken breast fan, but in this dish, the thighs really kicked up the richness factor, so that is what I use 90% of the time. Feel free to swap for chicken breast if you prefer it.
- BROWN RICE: Not only does brown rice taste amazing in a pressure cooker, but it’s better for you, too! Don’t use white rice, it will be mushy and overcooked.
- MARINATE: Yes, I know it requires planning ahead a bit, but to get GOOD Indian flavor, I HIGHLY RECOMMEND IT. At the very least, give it 30 minutes.
- BROWNING: A little browning goes a long way with this recipe! I only brown one side of the chicken. That is enough to get the flavor without the risk of getting a burnt layer on the bottom of the pot. Again, skip it in a pinch, but it’s fabulous.
- LITE COCONUT MILK: Use lite, not regular! Regular coconut milk is thicker and may cause a burn warning.
- EXTRA LIQUID: There may be extra liquid in the rice when you open the pot. It will absorb into the rice. If there is quite a bit extra, just hit sauté and simmer for a couple of minutes.
- RAITA TIP: Make sure to squeeze as much liquid as possible from the shredded cucumber. This will keep the sauce thick instead of watery.
HOW TO STORE, REHEAT, AND FREEZE
- STORE: Cool leftovers, then store in an air-tight container in the fridge for up to 5 days.
- REHEAT: Reheats well in the microwave or on the stovetop. Add a splash of water to the rice if needed to soften it up.
- FREEZE: Scoop leftovers into a freezer-safe container or ziptop bag and freeze for up to three months. When ready to eat, let it thaw overnight in the fridge, then reheat as directed above.
MAKE AHEAD TIPS
- Stir together the chicken marinade ingredients the night before, then place the chicken into the marinade the next morning.
- Raita can be made up to 2 days in advance and actually tastes even better on the second and third days.
WHAT TO SERVE WITH TANDOORI CHICKEN
- ROASTED VEGETABLES: My favorite is the roasted curry cauliflower from this Chicken Tikka recipe.
- TEMPURA CAULIFLOWER: A new discovery in the freezer aisle! If you can find it, throw it in the air fryer and put a big ol’ pile of it in your bowl. YUM!
- NAAN: I brush storebought naan with a little olive oil, then sprinkle with garlic salt. Put it in a 350°F oven for about 5 minutes until warm.
Okay, all you Indian food takeout lovers, it is now your job to try this dish and report back! I can’t wait to geek out with you over this yummy dish!
And to those new to the Indian food train or those who don’t want to join the Indian food train, jump on board and let me know what you think of this one!
Enjoy!

MORE INSTANT POT CHICKEN AND RICE RECIPES
- Instant Pot Chicken with Cheese Sauce
- Instant Pot Caribbean Jerk Chicken and Coconut Rice
- Instant Pot Chicken Ricotta Meatballs and Green Rice
TOOLS/INGREDIENTS USED
PrintTandoori Chicken and Rice | Instant Pot Recipe

This Tandoori Chicken and Rice is a one-pot meal full of warm spices and big flavors. Serve with fresh Raita!
- Prep Time: 20 minutes
- Cook Time: 25 minutes
- Total Time: 60 minutes
- Yield: 6-8 servings 1x
- Category: Dinner
- Method: Pressure Cooker
- Cuisine: Indian
Ingredients
For the Tandoori Chicken Marinade
- 2 pounds chicken thighs (see note)
- 2 teaspoons garam masala
- 2 teaspoons cumin
- 1 teaspoon coriander
- 1 teaspoon smoked paprika
- 1 teaspoon ground ginger
- 1 teaspoon ground turmeric
- ¼ – 1 teaspoon cayenne pepper (depending on how spicy you like it)
- 1 teaspoon garlic powder
- ¾ teaspoon salt
- ½ teaspoon black pepper
- ½ cup Greek yogurt
- Juice of 1 lemon (about 3-4 tablespoons)
- Optional: 1 Tablespoon chili garlic sauce for extra kick
For the Coconut Rice
- 1 cup brown rice
- ½ teaspoon turmeric
- 1 teaspoon cumin
- ½ teaspoon coriander
- 1 teaspoon salt
- ¼ – ½ teaspoon red pepper flakes
- 1 cup lite coconut milk (from a can)
- ¾ cup chicken broth or water
- 1 cup frozen green peas
For the Raita (can be made up to 2 days in advance)
- 1 cup yogurt
- 1/2 cup shredded cucumber, drained and excess liquid squeezed out – see note
- 1/2 teaspoon cumin
- 1/4 teaspoon garam masala
- 1/8 teaspoon garlic powder
- kosher salt and fresh ground black pepper to taste
- ¼ cup chopped fresh cilantro or mint (or a mix of both)
Instructions
- Place chicken thighs in a gallon size ziplock bag. Add the marinade ingredients, seal the bag, then move the chicken around in the bag until all of the chicken is covered with the marinade.
- Place bag inside a container (in case the bag leaks) and allow it to marinate for 6 hours. See note about marinade time.
- Once the chicken has marinated, add 2 teaspoons of oil into the pressure cooker pot. Using the brown or sauté function, heat the oil until hot.
- Add chicken and brown 3 – 4 minutes on only one side. This can be done in batches if needed, just watch the bottom of the pot so that it doesn’t burn. Remove chicken from the pot and set it on a plate. Turn off pressure cooker.
- While the pot is still hot, add rice, turmeric, cumin, coriander, salt, and red pepper flakes and stir to coat it with the leftover oil and seasonings from the pot.
- Add a splash of the chicken broth and scrape the bottom of the pot very well. If there are any browned bits stuck to the bottom of the pot, you might get a BURN warning on the Instant Pot.
- Add remaining chicken broth and coconut milk; stir.
- Place chicken on top; do not stir.
- Secure the lid and turn pressure release knob to a sealed position. Cook at high pressure for 25 minutes.
- While chicken cooks, prepare the Raita by adding all of the ingredients into a small bowl; stir to combine well. Store in the fridge until ready to serve (this could be done 1 -2 days in advance).
- When pressure cooking is complete, use a natural release (or release remaining pressure after 10 minutes if in a hurry).
- Remove chicken to a cutting board and shred into bite-size pieces.
- Fluff rice with a fork, then stir in green peas.
- To serve, spoon rice into a bowl, top with chicken, a spoonful of Raita, and fresh mint or cilantro if desired.
Notes
- I typically prefer the texture of chicken breast, but chicken thighs in this dish are magical: so tender and moist. Swap for chicken breast if you prefer.
- The long marinating time really boosts the flavor of the dish, but in a pinch, 30 minutes will suffice.
- Browning the meat on only one side gives you depth of flavor without the risk of the spices burning on the bottom of the pot. In a pinch, you can skip the browning step.
- Use LITE coconut milk, not full fat. Full fat is thicker and may result in a BURN signal.
- The rice might be a bit runny when you remove the lid. This can vary depending on the type of brown rice you use and how much liquid the chicken contains. If there is extra liquid, simply select sauté and let it simmer a few minutes to thicken.
- For the Raita, make sure to squeeze as much liquid from the shredded cucumber as you can to prevent the sauce from being overly runny. I like to wrap it in a clean, lint-free kitchen towel, then twist and squeeze to release the extra liquid.


The chicken is so flavorful and juicy, and the rice complements it perfectly. I love how simple yet aromatic the dish is, with the perfect balance of spices. This will definitely be added to my regular dinner rotation.
I made this last night and was nervous about my 25 year old grandson liking it, but he did. I did not brown the chicken, I was afraid it would be too spicy but the IP seemed to mellow out the flavors. I’m a huge fan of one pot dinners, thanks.
Linda, I’m so happy to hear that! And I can’t tell you how excited I am that your grandson liked it too 🙂
Yes, sometimes I hit start without browning too. There’s days for that too!
Oooh, I have everything to make this and it sounds delicious, like everything else you make :), but I ONLY have bone-in thighs. I’m going to try it anyway. I’m meal prepping for the week and also make your Magic Sunshine Soup–which is absolutely delicious!!! <3
Kat, bone in thighs should work great. Let me know what you think!
This looks delicious, I will be making it this week. You don’t indicate if this is boneless or bone-in. I’m thinking boneless.
Linda, I’m excited for you to try it! I use boneless. I suppose either would work, but I always use boneless.
Thank you, I will do that!
Thank you, this helps so much! I’m going to get everything ready today and have this chicken tomorrow!
I have to make this, but I need to cut in half (1 lb of chicken) . Do I need to cut the entire recipe in half (mainly the spices)?
Lisa, this is actually what I did last night because I only had a pound of chicken. I did the entire amount of marinade on the chicken and it ended up being too much. So what I would do is half the chicken marinade, but leave the rice and the spices that go with that the same. I hope you love it!