


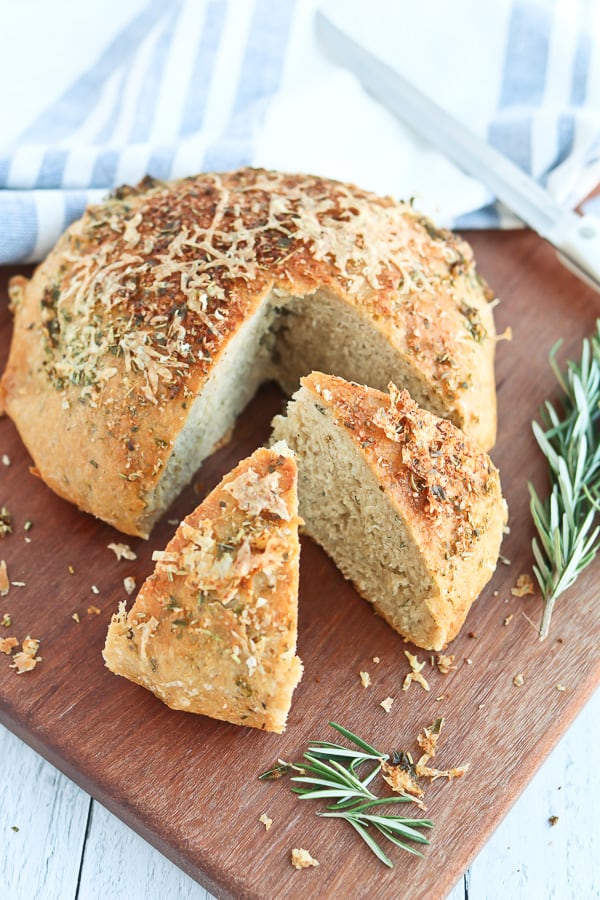
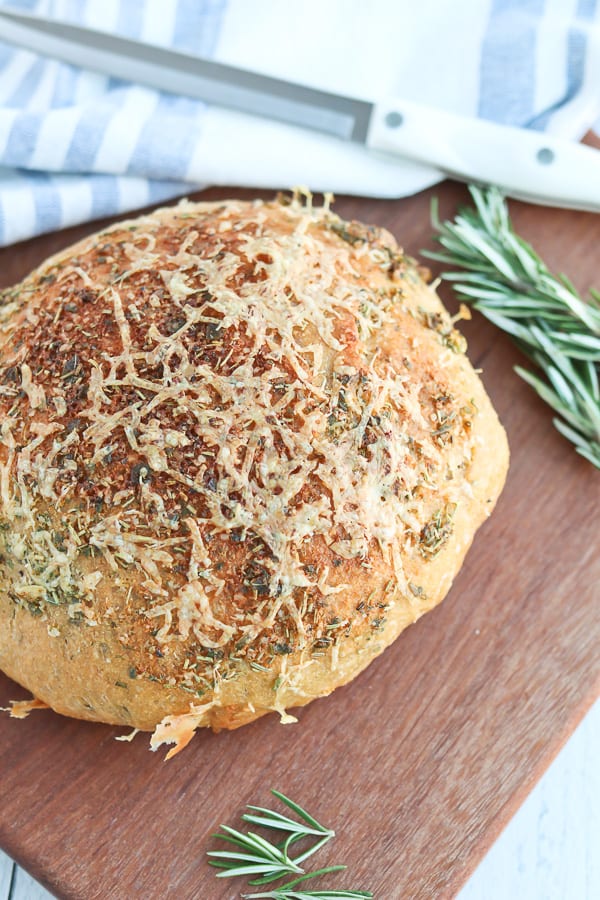
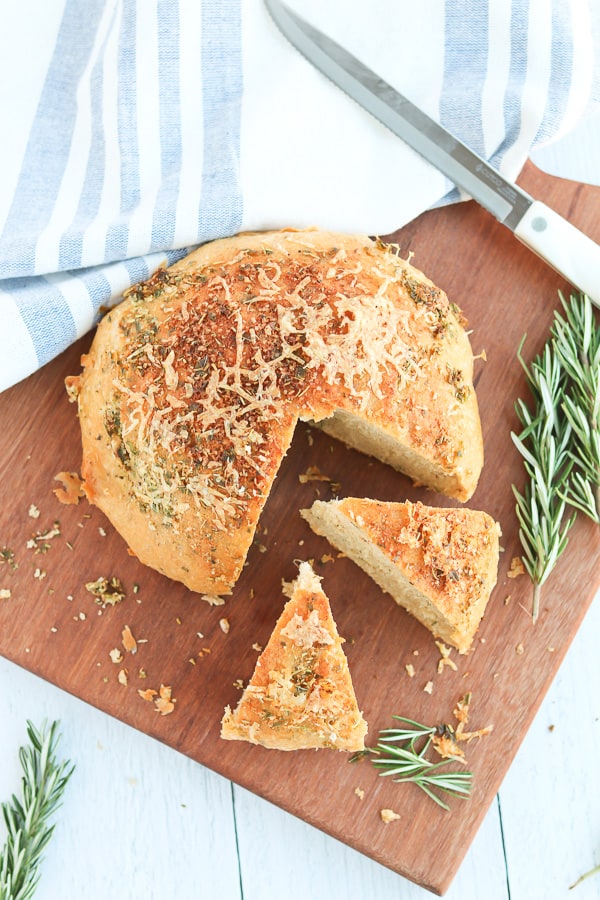
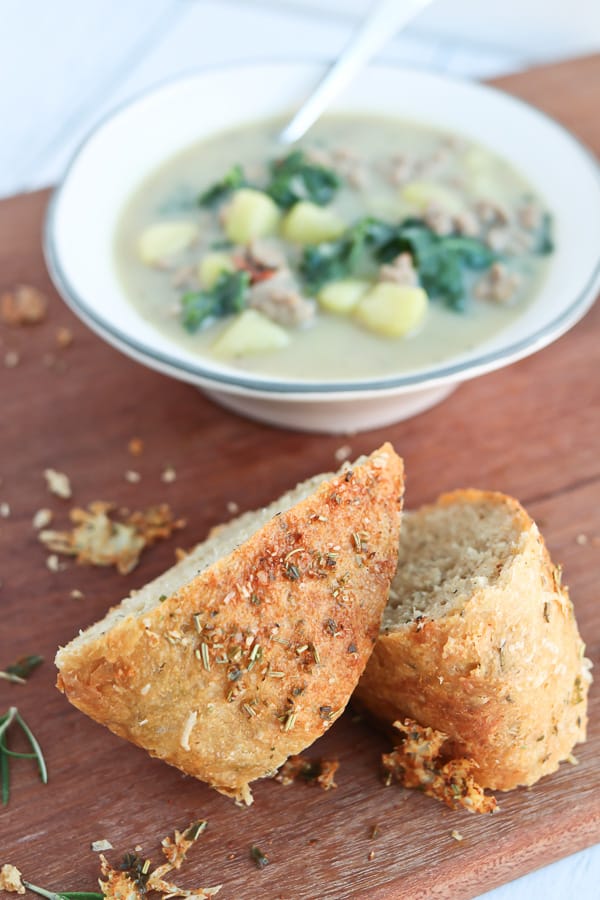
Whole Wheat Crusty Bread flavored with Rosemary and Asiago made in a fraction of the time with the Instant Pot. This warm, chewy bread is full of herby, cheese flavor and the crispy crust is slathered in garlicky butter and more shredded asiago cheese.
I just can’t stop with the Instant Pot No Knead Bread/Crusty Bread/Artisan Bread . . . I’m never sure what exactly to call it, but the bottom line is that I simply can’t stop my imagination from coming up with new flavors.
It’s like ice cream flavors. Just when you think every possible flavor has been invented, WHAM! You’ve got Twinkie ice cream.
After I discovered this basic Whole Wheat Crusty Bread recipe, the sky has been the limit ever since. I even made this very green Spinach and Artichoke version last year for St Patrick’s day. My kids’ reaction was priceless.
Word on the street is that there’s a restaurant called Macaroni Grill that makes a famous Rosemary Bread and a quick google search will show you a billion knock-off recipes.
Well, I’ve never eaten at a Macaroni Grill, but the popularity of this bread had me intrigued. I added some rosemary to my standard Crusty Bread recipe and thought, huh, that’s pretty good. You know what would make it even better. Cheese, duh.
I had some leftover asiago cheese in my fridge from this fabulous French Onion Soup and knew instantly that fate had just delivered me a golden nugget of an idea.
Whole Wheat Rosemary Asiago Bread with an asiago garlic topping was born and life became infinitely better.
Two days later I made croutons out of the leftovers to top my leftover French Onion Soup and nearly proclaimed to my three children that this day was greater than all of their births combined. To avoid emotional issues down the road, I held back.
I beg of you, don’t let one more day pass you by without this glorious combo in your life.
WHY YOU WILL LOVE NO KNEAD CRUSTY BREAD IN THE INSTANT POT
- The answer is in the title: it requires no kneading and it’s an incredible crusty, soft, warm bread which may be the only thing the entire world can agree on
- The Instant Pot creates a warm, moist environment to rapidly proof the bread. No knead bread is typically a 24-hour process, this method cuts that time down to five hours
- The parchment paper trick here is everything and makes it incredibly easy to transfer your bread with ease. Read more on this below
QUICK NOTE
To be clear, the Instant Pot does not “cook” your bread. It’s a miracle appliance for sure but it’s not gonna get you that crispy crust. The Instant Pot speeds up the proofing of the bread, the oven bakes it into a beautiful loaf.
HOW TO MAKE QUICK NO KNEAD BREAD IN THE INSTANT POT
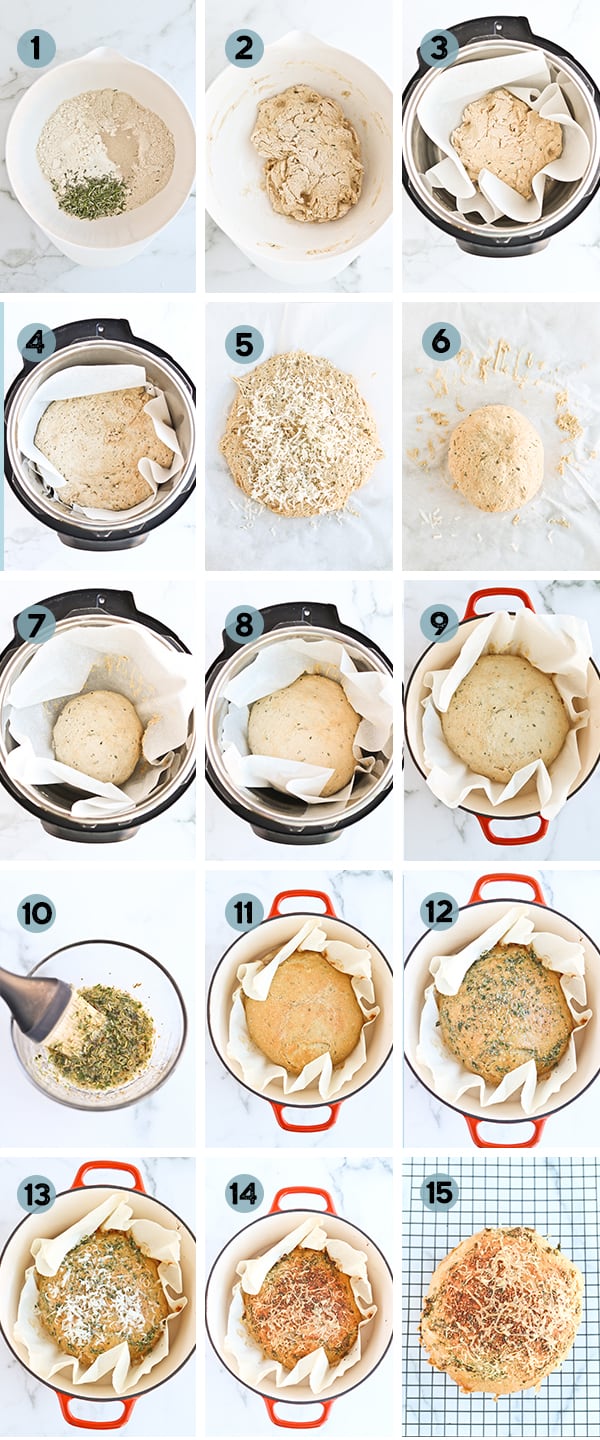
- Combine the dry ingredients
- Add water and mix together by hand. It’ll be shaggy and slightly sticky, but not a wet, stick all over your fingers, sticky. If it’s still quite wet, and another tablespoon or 2 of flour
- Place dough on a piece of parchment paper and lower it into the Instant Pot. Secure lid. Press YOGURT, then adjust to low. Adjust the time to 4 hours and 30 minutes
- After 4 hours have passed, the dough will be puffed up and there will be small air bubbles on top. Turn oven to 450 degrees and place a ceramic pot or enamel cast iron pot inside
- Lift the parchment paper from the pot and onto the counter. Sprinkle dough with the shredded asiago cheese
- Pull the edges of the bread up over the cheese and shape into a ball
- Using the parchment paper, place dough back into the pressure cooker and secure lid
- After 30 minutes has gone by, the bread will have risen slightly
- Remove preheated pot from the oven, remove lid. Use parchment paper to transfer dough from the Instant Pot to the ceramic pot, tear off any overhanging pieces of parchment paper, then place lid on the ceramic pot. Bake for 30 minutes
- While it bakes, combine melted butter and herbs
- After 30 minutes, remove the ceramic pot from the oven and remove the lid.
- Brush the bread all over with the herb butter
- Sprinkle with a little asiago cheese and return to the oven for 15 minutes more
- Done!
- Place on a cooling rack to cool slightly (so it doesn’t smash when you slice it)
That may seem like a lot of steps, but this is a very hands-off kind of recipe that is so incredibly rewarding.
PS: your house will smell incredible and your husband just might send you a random text telling you you’re beautiful and he loves you. I asked him if he was spellbound by my pony and yoga pants or by the smell of asiago and garlic. It’s debatable.
Dip it, Dunk it, Scoop it, crouton it, panini it, whatever you want! This warm chewy bread is flavorful to the max and the crispy, cheesy topping is gonna rock your world.
Enjoy!
VARIATIONS
I’ve written many variations of crusty bread on the blog
- Whole Wheat Crusty Bread (with a mix of seeds and oats)
- Jalapeno Cheddar (the best!)
- Cranberry Pecan (leftovers make incredible french toast)
- Spinach and Artichoke
- Sun-Dried Tomato and Feta
EXTRA TIDBITS
WHY DOES “NO KNEAD BREAD” WORK
Have you ever wondered this? No knead bread typically uses a small amount of yeast and about a 24 hour rest time. In this article “The Secret of Great Bread: Let Time Do the Work” it says:
“The long, slow rise does over hours what intensive kneading does in minutes: it brings the gluten molecules into side-by-side alignment to maximize their opportunity to bind to each other and produce a strong, elastic network.”
Pretty cool, right! I’ll save you the book report and let you click on the link to read more.
WHAT TO SERVE WITH CRUSTY BREAD
Soup of course! For this bread I suggest:
- Instant Pot French Onion Soup
- Instant Pot Spring Minestrone
- Instant Pot Cheesy Meatball Sub Soup
- Instant Pot Tomato Basil Soup
- Instant Pot Baked Potato Soup
TOOLS USED TO MAKE INSTANT POT WHOLE WHEAT ROSEMARY ASIAGO CRUSTY BREAD
Instant Pot Whole Wheat Rosemary Asiago Crusty Bread
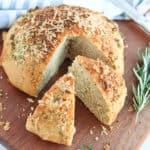
Warm Crusty Bread alive with herby, cheese flavor. Perfect for dipping.
- Prep Time: 30 minutes
- Cook Time: 5 hours
- Total Time: 6 hours
- Yield: 1 loaf 1x
- Category: Bread
- Method: Pressure Cooker
- Cuisine: American
Ingredients
- 2 1/4 cups (or 9 oz) white whole wheat flour
- 1 cup (or 4.25 ounces) white flour or bread flour
- 2 tablespoons vital wheat gluten (see notes)
- 2 tablespoons fresh rosemary, minced
- 1 1/2 teaspoon salt
- 1 teaspoon instant yeast
- 1 1/2 cups room temperature water
- 1/2 cup shredded asiago cheese
For the Garlic Butter
- 2 tablespoons butter, melted
- 1 teaspoon garlic powder
- 1 teaspoon dried basil
- 1 tsp fresh rosemary, minced
- 1/2 teaspoon dried oregano
- 1/2 teaspoon kosher salt
- 2 tablespoons shredded asiago cheese
Instructions
- In a medium bowl, mix together wheat flour, white flour, wheat gluten, rosemary, salt, and yeast.
- Add the water and mix with your hands until the majority of the flour is incorporated, but the dough is still a slightly shaggy looking ball.
- If the dough is still quite wet and sticky, sprinkle an extra tablespoon or 2 of flour on top and gently fold it in. You want the dough to be tacky, but not so wet and sticky that it coats your hands when you’re working in the flour.
- Place on top of a piece of parchment paper and put inside the Instant Pot liner.
- Secure the lid. Press yogurt, then adjust until the screen reads 24:00 low. Adjust time to 4:30 and wait for the beep to indicate the cycle has started.
- After 4 hours, place a 6 – 8 quart cast iron pot with its lid on, inside the oven. Preheat oven to 450° F.
- The dough will have puffed up a bit and have small bubbles on top. Grab the sides of the parchment to lift the dough out of the pot.
- Flatten the dough slightly, then sprinkle the asiago cheese over top.
- Roughly fold the edges of the dough over the cheese, it doesn’t have to be perfect, just fold and tuck to incorporate the cheese inside the dough. Form dough into a ball.
- Place back on the parchment paper and return to the Instant Pot for the remaining 30 minutes. Secure the lid.
- After 30 minutes, the oven should be preheated and the dough will have slightly risen. Remove the pot from the oven and set the lid aside.
- Holding on to the sides of the parchment, carefully lift dough from the pot and place inside the cast iron pot (parchment paper and all). Tear off any parchment paper that is hanging over the pot.
- Place lid on top and put inside the oven and bake for 30 minutes.
- While the bread cooks, combine Garlic Butter ingredients in a small bowl.
- After 30 minutes, remove the lid of the ceramic pot and brush Garlic Butter all over the top of the bread and sprinkle with 2 tablespoons of shredded asiago.
- Place the bread back in the oven (without the lid) and allow the bread to cook 10 -15 minutes longer until the bread is nicely browned and crisp.
- Holding the corners of the parchment paper, place bread on top of a cooling rack. Remove the parchment paper if you can handle the heat. This will help the bottom of the bread stay crisp.
- It’s best to let it cool slightly so it doesn’t smash while cutting, but if you lack self-control like I do, grab a sharp knife and start cutting uneven chunks of bread. Slather with butter and devour.
Notes
- For an even lighter loaf increase the amount of white flour to wheat flour
- Vital Wheat Gluten helps to create a lighter loaf of bread. If you want to try it without, I would recommend using more white flour and less whole wheat
- I use the enameled cast iron dutch oven pot for all my crusty bread making and I LOVE it! You can also use a heavy ceramic pot, dutch oven, or other pots and pans that are safe to use at 450° F


Do you think that this would work making it the day before? I wonder how well it would reheat.
Hi Cyndi, It’s definitely better fresh (like most crusty bread is) but if you wrap it in foil and reheat in a 300 degree oven, it will taste lovely. It just won’t have quite the crunch on the outside like fresh does.
Hi Marci. It has been a while since your last reply on the yogurt button issue. My IP doesn’t have a yogurt button as Claire noted. I tried to make it but it didn’t work. Have you been able to come up with an alternative if your machine doesn’t have a yogurt button? Thanks Carol
Carol, I haven’t tried it with any other settings. I’m sorry! If I experiment, I’ll report back!
Hi there,
I have been to Macaroni Grill and their Rosemary bread is wonderful. I am looking forward to trying your recipe. One question though….what size IP do you use? I have a 3 quart and a 6 quart IP but I also plan on making chicken noodle soup with the bread so I need the 6 quart one for that. Can you make it in the 3 quart IP? Or maybe I can make the bread in the early morning for the proofing and the 6 quart one will be ready for the late afternoon soup making.
Thanks
Jackie, It’ll make your house smell amazing! I use a 6 quart pot for rising bread, but I think the 3 quart would work fine, just use a different lid than the Instant Pot lid in case it rises too high (the lid can get stuck on if the dough pushes the button up from inside). That sounds like my kid of meal 🙂
It’s still winter so no fresh rosemary. Have dried from last years garden. Can I reduce amout by 50% and use dried?
Phil, absolutely! Typically when using dried herbs, a third of the fresh herb amount is good.
I reccomend changing the order of ingredients – asiago cheese should be listed AFTER water so all ingredients are listed in order they are used. I have a loaf in my cooker now with the cheese mixed in the dough. Fingers crossed it turns out okay.
Suzanne, Thanks for giving me a heads up on that. I always write my recipes according to the order that things go in and I feel bad that I didn’t catch that. When I was testing it, I did add the cheese in the beginning, and it works too! My concern was having cheese at room temperature that long. I know there are other recipes that do that, so I believe it’s fine, but I figured I’d veer towards the safe side when I shared it.
Silly question, directions say 4:30 on yogurt function, but then you mention that the dough will have puffed up a bit and have bubbles at 4 hours. Do you take the dough out at 4 or 4:30? Thanks!
Shannon, I can see how that might be a bit confusing. Basically, at 4:00 you are taking it out, adding the cheese, and shaping it into a ball. Then putting it back in the Instant Pot until the oven is preheated, which will be about 30 minutes (which is why I set my timer for 4:30). Does that help?
Thank you so much for the response… I figured it out before I read your response. Temporary fuzzy brain with a three and one year old driving Mom crazy. Lol. I made this yesterday and it was amazing! Thanks for the recipe.
Shannon, Oh I feel you on that one. When my kids were that age I remember reading a recipe over and over again and nothing sinking in. Having school-age kids has given me my brain back. I’m glad it worked out!
A winner! I doubted my technique …especially when adding cheese and folding the dough on itself…it was super sticky and hard for me to get off the paper. But I grabbed new paper, picked up the ball and carried on! It turned out to be very tasty. I decided to try your tomato soup to go with it…which was fantastic. ????????????
Shelley, Add a touch more flour next time and that should take care of the stickiness, but as you noticed, it’s forgiving either way. The tomato soup on the side was a very great decision 🙂
could I make this in my bread machine?
Esta, I’m sure there is some variation you could do, but it’s been years since I’ve used a bread machine, so I’m not sure!
Hi Marci – I’m making this bread right now, but why did I set my Yogurt setting to 24.00 low first, then move it to 4.30? I’ve never used Yogurt setting before, so I hope it turns out. It’s in the rising stage right now. P.S. LOVE your recipes – I should post when I’ve made them.
This looks fabulous! Like many of the commenters, I don’t have the type of ceramic pot you describe, but I have a cast iron pan. I’m assuming that’s okay, but I don’t have a lid for it?? Do you think I can use it without the lid. Seriously want to try this today–yum!
Heather, I’ve read recipes that suggest a double layer of foil. I bet that would work great.
Nanci, The 24:00 is what most Instant Pots will default to, so I adjust it to 4:30. Does that make sense? And yes! I love hearing feedback on my recipes. It’s the best thing ever to hear when someone else likes something you worked on 🙂
Is there another option for bakeware? I definitely do not have a cast iron or ceramic pot and don’t want to drop $80.
Susan, I’ve used my oven proof pots before, and they work perfectly.
Excellent! Thank you. Do you think I could get away with a 5qt if I’m willing to accept any weirdness that comes from a slightly smaller pot?
Yes, that will work. I’ve used a smaller pot before.
Ok, I am seriously in drool mode. I love bread and this flavor combo? Perfect! I don’t have a ceramic pot though…is there something else I can use while I wait to get one?
Cecilia, I have some oven proof pots that I’ve used when I make more than one and they work great! I always wrap the handle and lid handle in foil just in case. It’s probably not necessary to do that though!
If you don’t have a yogurt button on your pot-is there an alternative?
Claire, Sorry, I haven’t tried it without the yogurt button! I suspect you could let the bread sit at room temp for 18-24 hours instead, like the traditional no knead bread does.
I’ve heard that the “Keep Warm” button works.
Nancy, I hadn’t tried that, thank you! I’ll pass that along.