


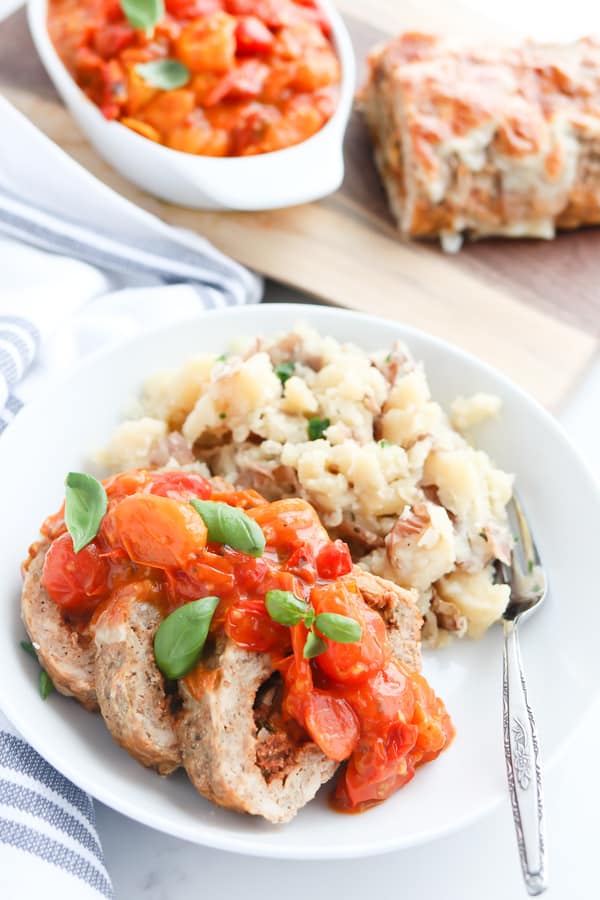
One pot wonder meal right here! Instant Pot Stuffed Italian Meatloaf is filled with cheese, spinach, and pesto, then rolled up to make it a show stopping loaf of meat! The Smashed Red Potatoes get cooked up all at the same time in the same pot giving you a moment to go for a run, take a nap, take a bath, or to just sit with your feet up (#momgoals).
I watched my idol/future cohost Rachael Ray make 3 different versions of a rolled, stuffed meatloaf, and every time I thought to myself, “the pressure cooker would rule this recipe!” The execution of this recipe took some time simply because I couldn’t figure out what flavor profile to take on.

Chorizo meatloaf stuffed with peppers and onions? Buffalo chicken meatloaf stuffed with celery, carrots, and blue cheese? Maple sausage meatloaf stuffed with scrambled eggs, pepper jack cheese, and hash browns?
For sure they will all happen eventually, but I finally settled on Italian. Italian spiced meatloaf, slathered with tomato pesto, then layered with spinach leaves, and a mix of mozzarella, parmesan, and ricotta cheese, than dressed with an easy homemade tomato sauce. Yes, yes, YAS!
I was bored and over meatloaf in my 20’s. But STUFFED, ROLLED meatloaf is not just any meatloaf. One slice into this beauty and you’ll know exactly what I mean.

Right!? It’s filled with CHEESE and FLAVOR! And the sauce on top is not a 1:2 ratio of ketchup and brown sugar. It’s fresh, bright, real tomato sauce. I’m not even a huge meat eater, but THIS is amazing!
Speaking of tomato sauce . . . I make this ALL THE TIME! I love it so much! It’s made an appearance in this Pizza Mac and Cheese and Hasselback Chicken Cordon Bleu. But if the tomato skins bother you or you want an easier alternative, use your favorite marinara sauce. Both homemade or store-bought will pair perfectly with the Italian spiced meatloaf.

This may seem complicated, but it’s so very simple. Here is a step by step to prove it to you.
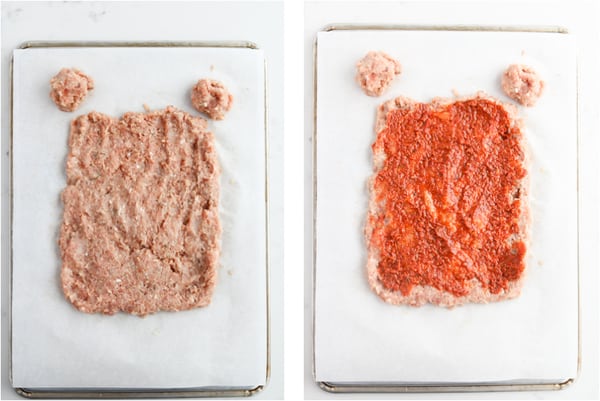
FIRST
Pat your seasoned meat out onto a piece of parchment paper (I like to lightly mist it with nonstick cooking spray). You’ll need to make small balls for patching the ends once it is rolled (I wasn’t trying to make ears on the meatloaf, which is what my kids thought)
SECOND
Slather the meat with sun-dried Tomato Pesto (can substitute with regular basil pesto)
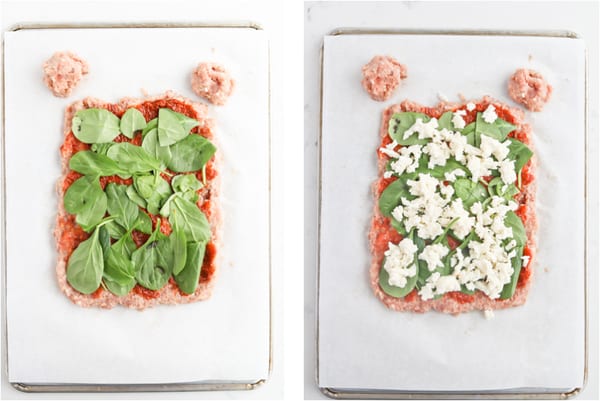
THIRD
Scatter with spinach and cheese mixture
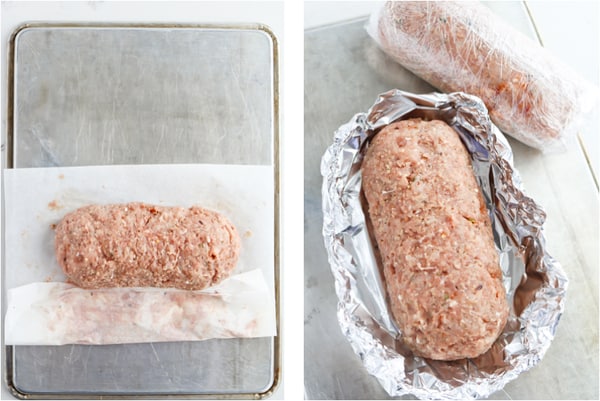
FOURTH
Use the parchment paper to help roll the meat, tucking and patching if needed as you go. Then use the small balls to patch the two ends so the filling is securely enclosed.
FINALLY
Make a boat out of tinfoil to hold the meat and to prevent all the cooking juices from leaking out. You can cook both at the same time in an 8 quart pressure cooker or wrap the second loaf in plastic wrap to freeze for another night (more details on this in the recipe).
That’s it! An amazing rolled meatloaf with less effort than trying to roll a giant, slippery sleeping bag (assuming I’m not the only one that finds this to be a bit of a struggle).
And what is meatloaf without the potatoes! Even the standard mashed potatoes are getting a makeover here because these are SMASHED Red Potatoes with buttermilk and chives, all cooked up in the same pot.

Traditional Meatloaf and Potato dinner makeover = SUCCESS!
And I haven’t even told you my favorite part! You can cook one meatloaf for dinner now, and freeze the other for a crazy easy meal another night. Cook once, eat twice!
I’ll get started on the other meatloaf versions I’ve been wanting to try out, but for now, give this Italian version a try ASAP and PULEEASSE let me know what you think!
Enjoy!

Tools used to make Instant Pot Stuffed Italian Meatloaf and Smashed Red Potatoes
PrintStuffed Italian Meatloaf and Smashed Red Potatoes

Meatloaf and potatoes are getting a serious makeover today. Stuffed, rolled meatloaf – Italian Style!
- Prep Time: 20 minutes
- Cook Time: 30 minutes
- Total Time: 60 minutes
- Yield: 8 servings 1x
- Category: main meal
- Method: Pressure cooker
- Cuisine: American
Ingredients
For the Smashed Potatoes
- 2 pounds baby red potatoes, scrubbed and rinsed
- 1 tablespoon Italian seasoning
- 1 teaspoon kosher salt
- 1 cup reduced sodium chicken broth
- 1 cup buttermilk
- optional, fresh chives, diced
For the Meat Mixture
- 1 pound Sweet or Spicy Italian Turkey Sausage (the kind in a casing)
- 1 pound lean ground turkey
- 1 cup whole wheat panko
- 1/4 cup milk
- 1 egg
- 1 tablespoon Italian seasoning
- 2 teaspoons dried onion flakes
- 3 cloves of garlic, minced
- 2 teaspoons kosher salt
- 1 teaspoon ground black pepper
- 1/2 teaspoon red pepper flakes
For the Filling
- 1 1/2 cup shredded mozzarella cheese
- 1/3 cup part skim ricotta cheese
- 1/4 cup grated parmesan cheese
- pinch of kosher salt
- pinch of ground black pepper
- 2/3 cup sun-dried tomato pesto (can substitute regular pesto)
- 1 cup fresh spinach leaves
For the Tomato Basil Sauce (optional, substitute with your favorite pasta sauce if desired)
- 2 pints cherry tomatoes
- 1 tablespoon butter
- pinch of kosher salt
- 1/4 cup fresh basil, torn
Instructions
- Add potatoes, Italian seasoning, kosher salt, and chicken broth to the pressure cooker pot and place a trivet over the top of them.
- Into a large bowl, squeeze the sausage from the casing and discard the casing. Add ground turkey, panko, milk, egg, Italian seasoning, dried onion, garlic, kosher salt, pepper, and red pepper flakes, . Mix until everything is well combined. Set aside
- In a small bowl add the mozzarella, ricotta, and parmesan cheese. Add a pinch of kosher salt and pepper and stir to combine. Set aside.
- Place half of the meat mixture on a piece of nonstick tinfoil or parchment paper (spray foil or parchment paper with nonstick cooking spray to make the rolling step easier). Break off 2 small golf ball pieces and set them to the side (these will be your patches for the ends of the meat once it is rolled). Flatten it with your hands into a rectangle that is about an inch thick. Mine was about 9 x 7 inches. Spread 1/3 cup of pesto over the meat, except for about 1 inch at a short end. Scatter 1/2 cup spinach leaves over the pesto and press down. Finally, sprinkle 1/2 of the cheese mixture over the spinach, again leaving 1 inch at the short end empty. Beginning at the short end that is not empty, start rolling the meat like a sleeping bag. Use the foil or parchment to help roll it over itself until you reach the end. Pinch and press the line to tightly seal up the ingredients inside the meat. Use the golf ball sizes of meat to patch the 2 ends. You want everything tightly sealed inside so your cheese doesn’t leak out while it cooks. Repeat with the second half of meat mixture.
- Note: It is possible to squeeze both loaves into an 8 quart pressure cooker side by side or if you have 2 trivets of different heights, you could stack both loaves in a 6 quart (of course omitting the potatoes). Or what I do is cook one for dinner and wrap the other in plastic wrap and put it inside a freezer safe ziplock bag and freeze it for another day.
- Make a boat out of tinfoil for the meatloaf to sit inside. You don’t want the juices dripping all over the potatoes below (or maybe you do! It would be flavorful, just quite greasy). Place meat on a trivet over the potatoes.
- Secure the lid and turn pressure release knob to a sealed position. Cook at high pressure for 30 minutes.
- While the meat and potatoes are cooking, prepare the Tomato Basil Sauce. Note: this step is optional and can be substituted with your favorite marinara sauce if you want to skip it. Place a skillet on your stovetop and turn to medium high heat. Add cherry tomatoes to the pan and let them get a light char on 1-2 sides. Add butter and lightly smash tomatoes (be careful! When the tomatoes burst, that juice is hot). Season with a pinch of kosher salt and pepper. Turn heat down to medium or medium low and allow sauce to simmer until nice and thick, about 2-3 minutes. Add basil and stir. Take off the heat, cover, and set aside.
- When pressure cooking is complete, use a natural release for 10 minutes and then release any remaining pressure.
- Remove the tinfoil boat of meat carefully and drain and discard the extra liquid. Place on a cutting board.
- Drain most of the liquid from the potatoes into a bowl. Mash the potatoes directly in the pot until they are as smooth or chunky as you like them. Add buttermilk and stir adding more of the cooking liquid back into the pot if the potatoes are too dry. Sprinkle the top with chives and serve straight out of the pot. This will not only save you a serving dish to clean but will keep the potatoes warm if you leave it on Keep Warm.
- To serve: Slice meatloaf with a sharp knife. Place a slice on a plate and top with hot Tomato Basil Sauce or your favorite marinara sauce. Put a scoop of Smashed Potatoes to the side and eat plain or topped with a dollop of sour cream.
Freezer Meal Instructions:
- Wrap prepared and rolled meatloaf in plastic wrap then place it inside a freezer safe gallon size ziplock bag. Label the bag with the recipe, date, and contents. Freeze.
- When ready to cook, place frozen meatloaf inside a tinfoil boat and on a trivet inside the pot as directed above. Cook at High Pressure for 45 minutes followed by a 10 minute natural pressure release. I advise checking the internal temperature of the meat to make sure it is between 155 – 160° F. Proceed with the rest of the instructions above.
Notes
- The meatloaf can be prepared and rolled a day or 2 ahead of time. Wrap it tightly with plastic wrap so it maintains its round shape.
- A drizzle of balsamic glaze over the meat and potatoes would also be delicious!
Recipe inspired by Rachael Ray


I cooked the frozen one tonight and it was just as tasty if not as eye appealing. One caveat…make sure the loaf you shape is small enough length wise to fit in your pressure cooker before you freeze it. The one I froze did not fit and I couldn’t “squish” it into the pot. So I had to defrost a bit so I could make it fit length wise. I suppose I was able to squish the first one and make it fit. I didn’t think about it being frozen hard and not being able to fit it in the pot. Still turned out well and I would recommend
Glinda, oh bummer! I’m glad it all turned out okay!
THIS was delicious! Time consuming, I must say, but at least I have another one in the freezer for an easy meal. The Smashed red potatoes were also very good. I had larger red potatoes so I halved or quartered depending on the size. First time making potatoes in the IP and will not be my last. I used a different recipe for a marinara sauce for the topping. Very tasty! Thank you for sharing!
Glinda, I swear it tastes even better from frozen! To make it quicker next time, my sister made it for me the other night without the filling and it was DIVINE!
Marci, this sounds good although I’m wondering if you could sub a lean ground beef and italian sausage for the turkey.
Glinda, absolutely! That will work great.
Made the first one about a month ago and froze the second one. Last night I popped the rolled loaf from the freezer after an incredibly long work day with no plan for dinner – my family was blown away. I popped it under the broiler to brown it a little. Will make this part of our rotation. Thank you!
Alexandra, Isn’t it great! I’ve done the same thing a few times, and maybe it’s all in my head, but I think I love the frozen one even better. Probably because I didn’t have to do anything for it 🙂 Thanks for reporting back! I loved hearing it!
I agree- it was better after it was frozen. Making four of them now! Then onto your June menu.
Yes please! And thank you… 🙂
My husband is a meatloaf lover and I’m part Italian so this is singing my song. The rolling and stuffing part is going to be an adventure for me as rolling and stuffing food items usually is. But I’m ready to jump in and give it a go. This looks too good NOT to. I bet my daughter will like it too since they’re ground turkey fans. I’ll have to give her the heads up. Thanks Marci!
Carol, this recipe was meant to be in your home it sounds like ????. Spray the parchment paper with nonstick cooking spray and that definitely helps, but over all, it wasn’t difficult at all. Just pinch and patch any holes that come along. You will love it!