


Looking for a natural way to dye eggs for Easter? LOOK NO FURTHER! This Instant Pot method for making egg dye is incredibly fast and easy as can be! Your family will love seeing how food at the grocery store can make beautifully colored eggs!

This here recipe/how-to is next level for sure.
You know that smile you get on your face when you watch someone’s baby coo and giggle? Do you ever just look at your pressure cooker and get that same grin? Yeah, me neither, because that would be totally weird . . .
Buuuuuuutt, if I did, it would be for this recipe. Natural Easter Egg Dye in the Pressure Cooker!

My kids were in awe, I was happy dancing, and my husband was smirking in my direction.
Homemade, bright, beautiful color dye in minutes in the pressure cooker. That, for me, is next level.
My kids LOVED this! They helped me plop our Perfect Hard Boiled Eggs into the mason jars and every hour or so they would check to see what color they had become.
Okay, maybe it was every 2 minutes that they wanted to check, but I LET them check every hour until they were the color they wanted them to be.
They couldn’t get over the fact that we had dyed Easter eggs with food and I’m gonna go ahead and say it was even more fun than the artificial tablets in a box we’ve used in years past.
WHY YOU WILL LOVE MAKING NATURAL EASTER EGG DYE
- No artificial dyes anywhere to be seen! This is all made from nature’s bounties, some of the colors are even made from trash (onion peels!)
- Intense beautiful colors! The longer you let the eggs bathe in the dye, the more colorful they’ll become
- No weird transfer of taste from the dye to the egg. I promise, you won’t end up with a cabbage tasting egg
- It’s just plain fun. There is something so rewarding about this process and kids find it positively magical

HOW TO MAKE NATURAL EGG DYE IN THE INSTANT POT
- Prepare the dying agent (in this case, chop up purple cabbage)
- Pressure cook for 10 minutes
- Pour through a strainer
- Add vinegar to the colored liquid, stir
- Place hard boiled eggs in the jar
- Let soak for an hour or overnight until you reach the desired color intensity

Look at that color!!! Isn’t that amazing!

Whether you want to make your own Natural Easter Egg Dye for the natural aspect or just for the fun of it, this is the only way to go!
If you do this on the stovetop, it takes at least 40 minutes of boiling to get this kind of color intensity.
Plus after 40 minutes of boiling cabbage and onion peels, whoa mama, your house is gonna reek. I even put the pressure cooker outside to make these which meant my house still smelled like lavender vanilla at the end of the day.
I will say I had a few flops while I was experimenting. I tried to use spinach and tea bags but they all ended up barely lending any color to the egg. If you have experience with this and have other colors that have worked, hook me up! I will be using this method for years to come!
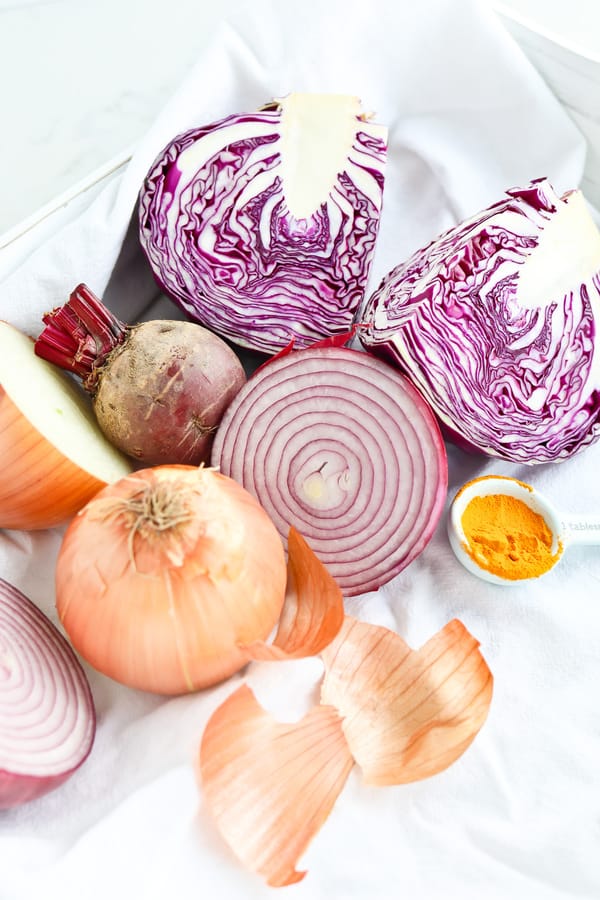
Here are the foods I used and the colors I achieved. Note: The eggs pictured here were left in the liquid anywhere from an hour to overnight, that is why there is such a variety of color.
Purple Cabbage = Blue (my personal favorite)

Beets = Pink

Yellow Onion Skin = Orange

Ground Turmeric = Yellow
(Note: Next time I plan on hunting down fresh turmeric since the powder in the bottom of the jar made them dye unevenly)

Red Onion Skin = Red (more of a rusty red)

There you have it! An adorable basketful of Hard Boiled Eggs, all different shades with a touch of character on each one.
TIPS FOR MAKING BEAUTIFUL, NATURALLY DYED EGGS
- The eggs will not dye well where they press against the mason jar. To avoid white spots, gently move the eggs around in the jar occasionally to allow for the dye to color the entire surface
- The color will rub off slightly while the eggs are wet. Allow them to fully dry before handling them. The color will become permanent once dry
- The peeled eggs can be placed in the dye for a fun and festive twist on deviled eggs. You can achieve a beautiful color in less than an hour. I barely tasted the dye, and I suspect with the deviled egg filling, I wouldn’t notice it at all, or it may even make the deviled eggs more flavorful!

In case I’ve failed to say it less than 50 times today, I REALLY, REALLY LOVE THIS RECIPE AND YOU REALLY, REALLY MUST TRY IT! Your kids will love this activity, I guarantee it!
Happy Easter! Unless you’re reading this post at a different time of year, in which case, this will still be a fun and educational experiment for the family!
EXTRA TIDBITS
ARTIFICIAL FOOD COLORING
For anyone wondering why I would go through the work of making natural egg dye, here’s some food for thought:
There are many differing opinions on the subject, but as the years go by there seem to be more and more concerns about the use of man-made/synthetic dyes. These dyes can easily be identified on a label as a color with a number, for example: Blue 1, Yellow 5, etc.
Research has shown possible evidence that such dyes cause problems particularly among children such as allergies, hyperactivity, irritability, etc.
While I don’t claim to be an expert on the subject, I do feel it’s worth paying attention to, and if I can make one small change for children’s well-being, such as making my own Easter Egg Dye, I’ll gladly take on the challenge!
Plus, it’s just a whole lot of fun seeing what you can create with pure, real, wholesome food!

Enjoy!

TOOLS USED TO MAKE NATURAL EGG DYE IN THE INSTANT POT PRESSURE COOKER
PrintHow to Make Natural Egg Dye in the Pressure Cooker

Quick and easy, all natural Easter Egg Dye made in the Instant Pot Pressure Cooker!
- Prep Time: 10 minutes
- Cook Time: 10 minutes
- Total Time: 30 minutes
- Yield: 24 1x
- Category: Easter
- Method: Pressure Cooker
- Cuisine: American
Ingredients
For each Homemade Dye
- 2 cups water
- dyeing agent (listed below)
- 2 tablespoons vinegar
Dyeing Agents
Blue Eggs
- 2 cups chopped purple cabbage
Pink Eggs
- 2 cups chopped, peeled beets (canned beets may work as well)
Orange Eggs
- 2 cups yellow onion peel
Yellow Eggs
- 2 tablespoons ground turmeric
Red Eggs
- 2 cups red onion peel
Instructions
Directions are for each individual dye. If making more than one color, rinse the pot thoroughly between each batch to prevent mixing colors
- Pour 2 cups of water into the pressure cooker pot and add desired dyeing agent.
- Secure the lid and turn pressure release knob to a sealed position. Cook at high pressure for 10 minutes.
- When cooking is complete, use a quick release.
- Carefully pour through a strainer into a larger bowl, discard dyeing agent.
- Pour colored water into a quart size wide mouth mason jar and add 2 tablespoons of vinegar. Top with a lid and place in fridge.
- Let it chill 4 hours or overnight before placing hard boiled eggs in the jar to dye.
- Repeat with the other dyeing agents to create more colors.
- Dye will keep in the fridge for at least 1 week.
- Note: Each jar will hold 4-5 eggs at a time. The eggs will have white spots where they touch each other or the jar so lightly rotate the jar a few times while they are in the jar for more even coloring.
To dye hard boiled eggs:
- Using a slotted spoon, gently lower eggs into the mason jar.
- Allow the eggs to sit in the dye for at least an hour or overnight, depending on how dark you want them.
- When they have achieved the color you want, use a slotted spoon to gently lift them from the jar.
- While they are wet, the color will come off if you rub on it too hard. Place on a cooling rack in the fridge to dry completely. This will set the dye so it won’t rub off.
- Once dry, store in an egg carton or other sealed container.
- Repeat with more eggs if desired.
Notes
- Naturally dyed eggs have more of a matte finish. Rub a little coconut oil on them to give them a shine if desired
- I tasted an egg from each dye and didn’t notice any change in taste to the egg. The eggs colored with beets did turn a little pink around the white.
- Naturally colored eggs will fade after a few days.


So fun to make. Such deep, and stunning colors on the eggs. I left the eggs in the jars overnight. Thank you for such an easy recipe to make all natural dyes for eggs for Easter.
I’m glad you could enjoy this! It’s one of my favorite things to do this time of year 🙂
2 cups of onion peel seems like a lot. How many onions did you have to peel to get 2 cups worth?
Mary, I don’t pack them necessarily. Probably about 2-3 onions. Then I dice the onion up and freeze it.
I found your post about dyeing Easter eggs with natural ingredients when I was searching for information about dyeing yarn using natural ingredients, specifically avocado peels and pits. Avocado peels and pits give a beautiful pink color to yarn. I don’t know what they would do for eggs. But since nothing needs to be added, and avocado provides its own mordant (no vinegar needed) , I may try some eggs after I do the yarn. The information you provided for prepping the dye bath using my IP is helpful.
Pendandra, Well now I can’t wait to try out the avocado idea! Thanks for sharing this amazing tidbit!
This is a new recipe for me. My traditional food is Asian food, I am exploring more new recipes and delicious dishes.
My mother in law has always done this, with onion skin. You can wrap rubber bands around the egg before dyeing them for stripes. Or pick clovers or leaves and put them against the eggs (use panty hose to keep it tight against the egg) and then remove them after dyeing, leaving behind a white space for decoration.
Raymond, I love those ideas! Thank you.
I love this idea…but I can see the kids being less than thrilled about having to let the egg sit in the dye for an hour instead of the usual few minutes. Hmm…trying to decide if it’s worth the effort for me.
Kami, part of the fun for my kids was checking on them throughout the day. We left some overnight just to see how dark they could get. I think you’ll love it 🙂
We hate artificial dyes because of our daughter’s ADHD. When she was little we taught her to look at labels for “colors with numbers.” We made egg dye a few years ago the stovetop way and they came out great, but I can’t wait to try your IP method!
Reenie, That’s great, way to empower your daughter! You’ll love this method, it’s so fun.
What a great idea!
I cannot believe the ingredients is ed to make the dyes!!! So beautiful!! Thank you for sharing!!????
My goodness, I meant to say ingredients used ????
Nancy, You’re so welcome! This is a really fun recipe!
What a great Idea!! Do you know if the dye that is created could be used on fabrics; and if so, will it remain permanently in the fabric?
Pat, I can’t say that I’ve tried that, but I am really curious. My daughter wanted to make a doll pillow case and I might let the material sit in it overnight, wash it, and see what happens. Let me know if you try it!
Pat you can – but you might need to use something to act as a mordant (which helps the dye stay stuck to the fibres) – sometimes vinegar is good enough. You also often have to boil fibres (e.g. fabrics, wool) with the dye to make it drive into the fibres. Might be interesting to try a little patch of cotton in with the cooking cabbage etc. in the instant pot to see what happens. We even used concentrated beet juice to dye my daughters hair once – it actually stayed in for a couple of days, even after rinsing! Definitely worth experimenting with.
Thanks Amie! That is so helpful!
Oh Marci! Why didn’t this exist when my children were young? (The Instant Pot method). Guess I’ll have to file this away for grandchildren someday or maybe I just need to play and make me some colored hard boiled eggs. 😉
Now the cheesecake? That I can do for my grown kids and they won’t laugh at me. Lol.
Cecilia, Grandskids would go crazy for this idea! It really was so fun. And that lemon cheesecake will have every grown up singing your praises!
Holy cow, this is genius! I am a throwback from my grandparents’ era and have often dyed eggs with vegetables, but yes, it was a major trade-off in deciding whether to have your house reek of various root vegetables for days or simply buy the little pellets from the store. I never liked using those artificial dyes, so this will be a fabulous project for us to do with our grandbabies this weekend. Thanks much, Marci!
Karen, That’s hilarious! My pot went outside to do this and I was so glad because when I let the pressure out for the cabbage, whoa, it was smelly, but my house stayed smelling beautiful. This recipe came about because of you so thanks for feeding my inspiration!
I am so glad my annoying questions ended up birthing something helpful! I love the Instant pot from saving my house from nefarious odors–your cabbage reminds me of the time I cooked orange roughy and the stench stuck around for a very long time–nothing got rid of that smell except leaving every window open for days–too bad it was January in WI!