


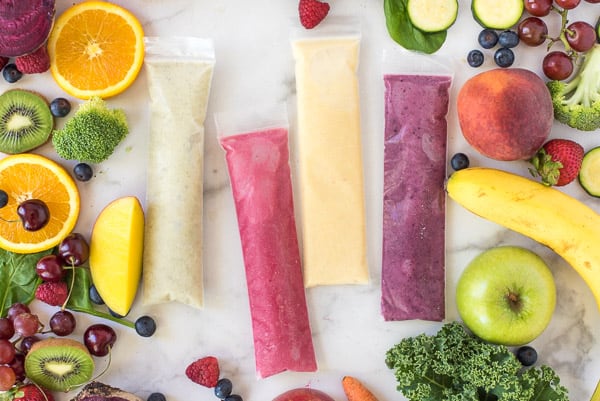
Homemade Yogurt Tubes are easy to make and a whole lot healthier than store-bought. Serve them cold or serve them frozen for a frozen yogurt type treat!
I’ll do just about anything to get more fruits and veggies into my kids’ diets, and this trick is a good one!
You know those yogurt tubes you buy at the grocery store that contain more sugar than ice cream, contain dyes and other additives, have popular TV characters on them, and confuse you by saying things like, “great source of calcium and protein”?!
You want to know what else is a great source of calcium and protein and contains no added sugar, dyes, additives, or pictures of my life long nemesis, Sponge Bob?
But to my dismay, my kids felt cheated that I rarely bought yogurt tubes for their lunch boxes like “everybody else”.
I’ve ignored the whines for a few years now, but finally decided to give in and give the kiddos what they wanted . . . kind of.
I’m giving them:
Homemade Yogurt Tubes “made by mama”, and I’ll even put a picture of myself dressed up as a superhero if it will seal the deal to their satisfaction. You’re welcome kiddos.

I’ve tried a few different recipes for homemade frozen yogurt tubes over the years, but I always ended up with three problems when trying to make healthy ones that used fruit instead of Koolaid:
- They were too runny
- They didn’t really taste like fruit
- When frozen they were more like an ice cube than a creamy treat
Well, I found a way to fix all of those problems!
I’ve been a consultant with Thrive Life for about a year now. I signed up mostly so I could stop bugging my neighbor to order me cans of freeze-dried mangos, grapes, and onions. I haven’t experimented with using freeze-dried food much, but those three items have become essentials in my pantry.
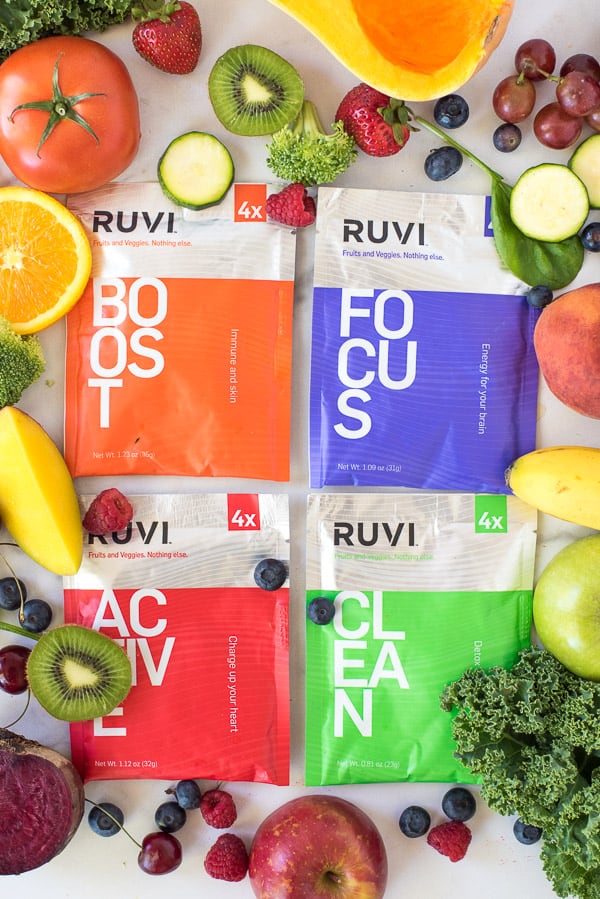
Thrive Life came out with a new product recently called RUVI.
RUVI are packets of freeze-dried fruits and veggies that have been blended into a fine powder. There are four different flavors and each contains 4 servings of fruits and vegetables per pack. They don’t contain any sugar or preservatives and they are a great way to squeeze more fruits and vegetables into the diets of you and your kids.
Typically people just dump a packet of the mix into water and shake it up, but since I prefer drinking unflavored water, I had a different idea:
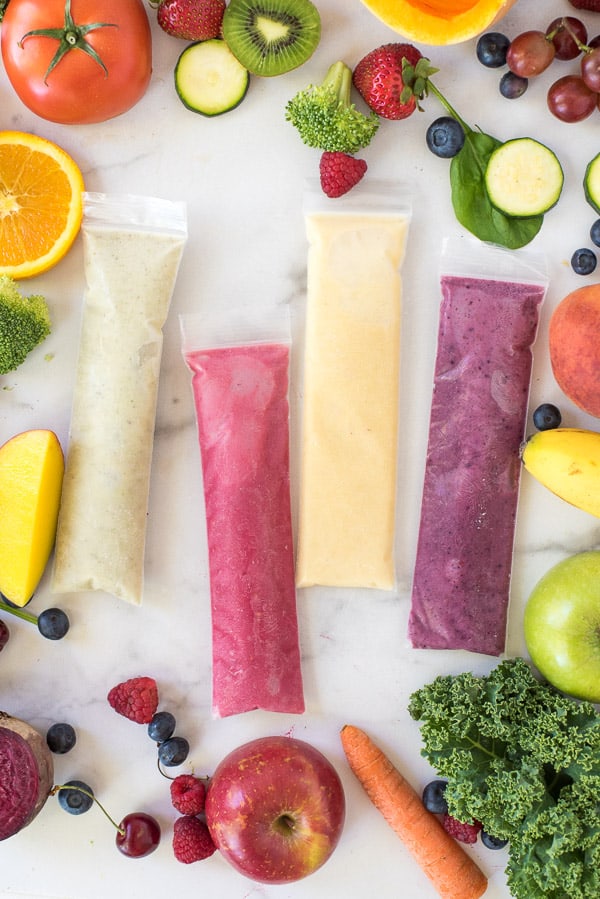
MIX RUVI INTO YOGURT TO MAKE FROZEN (OR UNFROZEN) HOMEMADE YOGURT TUBES!
BENEFIT OF USING FREEZE DRIED FRUIT POWDER TO MAKE HOMEMADE YOGURT TUBES
You can definitely go the route of blending fresh fruit with yogurt to make yogurt tubes, but from my experience, the powder works a million times better. Here’s why:
- Freeze-dried powder thickens the yogurt instead of making it runny like fresh fruit.
- It takes less than a minute to sprinkle the powder in your yogurt and whisk it together.
- RUVI actually tastes like real fruit. Fresh or frozen fruit doesn’t give as strong of a flavor and using Koolaid makes yogurt taste like the rainbow colored Halloween candy I hide and throw away when no one is looking.
- Freeze-dried food contains all the fiber, nutrients, and flavor of peak-season produce. In other words, these packets turn your yogurt tubes into a gold mine.
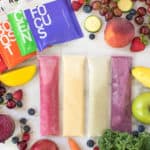
THE FLAVORS OF RUVI
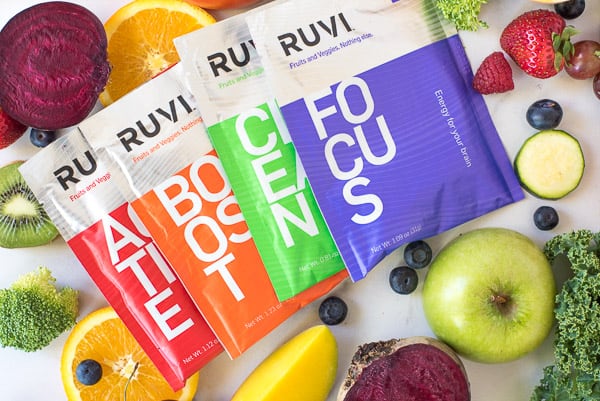
There are four different flavors of RUVI, all containing four servings of fruits and vegetables in each individual packet.
- RUVI Active: Fuji Apple, Tart Cherry, Carrot, Raspberry, Butternut Squash, Strawberry, Beet, Tomato
- RUVI Focus: Blueberry, Grape, Blackberry, Banana, Strawberry, Broccoli, Zucchini, Spinach, Acai, Maqui Berry
- RUVI Boost: Banana, Carrot, Mango, Peach, Pineapple, Butternut Squash, Kiwi, Orange
- RUVI Clean: Grape, Fuji Apple, Banana, Zucchini, Cucumber, Granny Smith Apple, Spinach, Kale
WHICH RUVI FLAVOR TO TRY FIRST
To help you know which flavor to try first, I’ll give the opinions of multiple age groups here.
Of the four flavors, my kids and I love the FOCUS and BOOST blends the best.
I LOVE the ACTIVE blend, but my kids don’t like the raspberry seeds.
My kids don’t like the CLEAN blend at all, but I can tolerate it until the cucumber taste kicks in. My 18-month-old niece, however, LOVED it.
So my overall suggestion would be: If you want to start with one flavor, go with BOOST because it’s like sipping on a tropical mango smoothie.
If you’re going to try out two, grab the FOCUS blend too. It tastes like my favorite banana blueberry smoothie.
If your kids don’t mind the seeds in berries, ACTIVE is really good, but I do detect a bit of a beet taste in it (if that bothers you).
CLEAN contains the most vegetables and the least amount of carbs, but if you’re sensitive to kale and cucumber flavors, you might want to avoid this one.
Okay, now that you know what RUVI is, back to the yogurt tubes!
WHY YOU WILL LOVE HOMEMADE FROZEN YOGURT TUBES
- VERY easy to make. I’m talking about 1 minute from start to finish!
- They’re approximately 1 billion percent better for you than the most popular store brand yogurt tubes.
- You’re feeding your kiddos more fruits and veggies and they don’t even know it! However, I actually showed my kids the package after they decided they liked them just so they could see that they actually ate vegetables and liked it!
- You can decide whether or not to add sweetener to your yogurt tubes and how much.
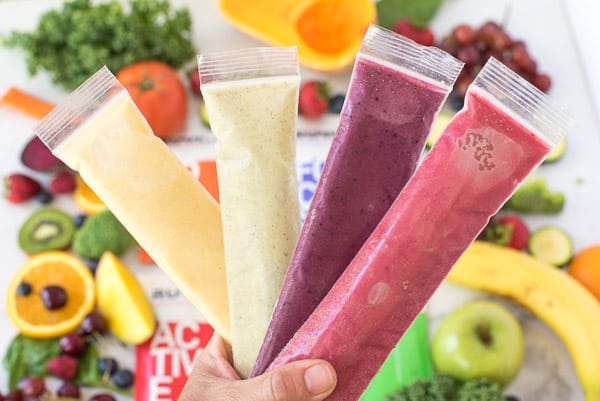
- Once frozen they are like a colorful, creamy treat that you feel good about handing out to your kids when they ask for a popsicle. “Sure kids! Have a tube of protein, fruits, and vegetables!”
HOW TO MAKE HOMEMADE YOGURT TUBES
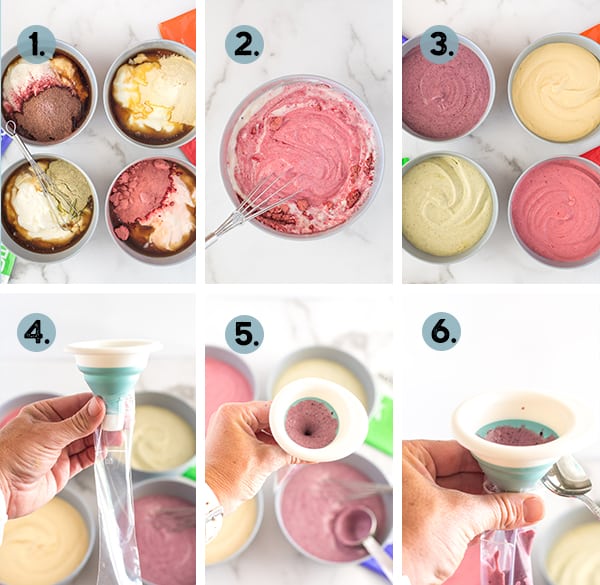
- Place yogurt, RUVI powder, and sweetener (if using) to a bowl
- Whisk together
- You want it very smooth and well incorporated
- If you’re putting them into disposable or silicone tubes, place a funnel in the opening
- Put scoops of yogurt in the funnel
- Hit the funnel with the side of a spoon to help the yogurt go into the tube
SEE RECIPE CARD BELOW FOR DETAILED COOKING INSTRUCTIONS
TIPS FOR MAKING THE BEST FROZEN YOGURT TUBES
- Let’s talk sweetener: You can use maple syrup, honey, coconut sugar, regular white sugar, agave, etc. I’ve tried syrup and honey and our preference is maple syrup. I haven’t yet experimented with other sweeteners.
- How much sweetener? That will depend on your crowd. For kids who are used to store-bought yogurt tubes, you might want to use 4 tablespoons to 2 cups of yogurt. I don’t buy the store-bought ones very often and 2 tablespoons seemed just right for my kids.
- If you have toddlers or kids that don’t like things particularly sweet, I would nix the sweetener altogether. The fruit gives a natural flavor and sweetness that will likely be plenty for them.
- Use homemade Instant Pot Yogurt! This isn’t a must of course, but once you’ve had homemade, it’s hard to go back to the taste of store-bought. Homemade is definitely less tart than store-bought and doesn’t have the chalky aftertaste that some brands do.
- If you are using store-bought yogurt, I would go with a regular yogurt instead of Greek. Greek is quite thick already and when you add the powder, it will thicken even more. If Greek yogurt is what you have, you could always add a little milk or juice to loosen it up.
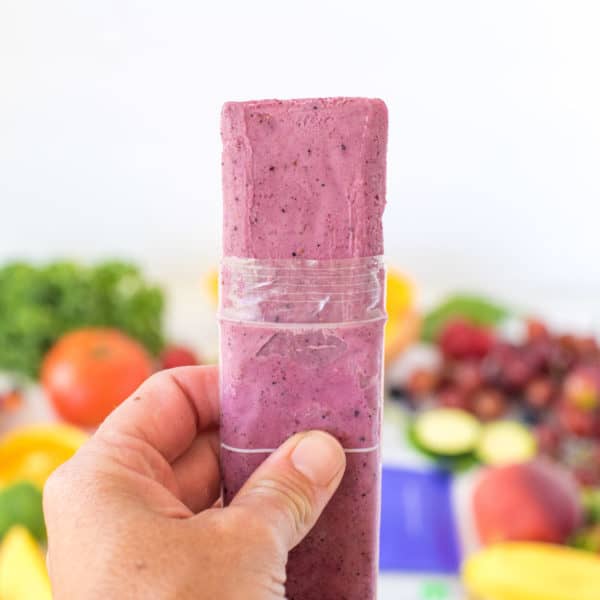
- You can either freeze them in disposable plastic tubes or use reusable silicone sleeves. I confess I go with the disposable option because I make several at a time, and my kids have lost many silicone tubes over the years in school lunch boxes.
- Once the RUVI powder gets mixed into the yogurt, it will start to thicken. If you’re pouring it into plastic or silicone tubes, do it right away since the thicker it gets, the harder it will be to get it to go through the funnel.
- To get the yogurt into the tubes, I simply place a funnel in the opening, put a big scoop of yogurt into the funnel, then bang the sides of the funnel to get it to fall in. I’m sure there is a more sophisticated way to do this, but it works great and goes quickly. If you come up with a better method, let me know in the comments!
- You can decide how much yogurt you want in each tube. For my family, I go with 1/4-1/3 cup, which seems to be equivalent to store-bought yogurt tubes.
- The yogurt tubes are good chilled from the fridge, but I highly suggest freezing them instead. They are so creamy and easy to lick/bite right from the freezer.
- The frozen tubes can be packed in school lunch boxes and will stay cold until lunchtime (just like a lot of people do with store-bought yogurt tubes).
HOW TO STORE AND FREEZE HOMEMADE YOGURT TUBES
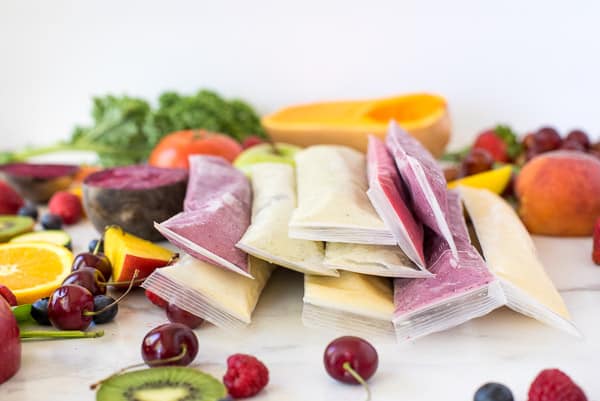
Once all of your tubes are filled, lay them on a flat surface (like a sheet pan) and place them in the freezer until frozen. It’s important that you freeze them flat because this will avoid any kinks in the tube that will make them hard to push up when you’re eating them.
Once frozen, I like to store them in the freezer in a ziplock bag or a freezer storage bin (just to keep them all together).
Straight from the freezer, they are a little challenging to push up, but within 3 minutes of being at room temperature, it’s pretty easy.
VARIATIONS OF HOMEMADE YOGURT TUBES
- Fresh Fruit Yogurt Tubes: If you’d rather use fresh fruit than freeze-dried, blend 1 1/2 cups fruit with 2 cups of yogurt and sweeten with 2 – 4 tablespoons of maple syrup or honey.
- Frozen Yogurt Dots: My kids love these! Line a sheet pan with nonstick foil or parchment paper. Place yogurt in a piping bag or ziplock bag, snip the corner and pipe dots of yogurt onto the pan. Freeze. Once solid, peel them off the pan and store in a freezer-safe container.
This was such a fun, unique discovery for me, I can’t wait for you to try it out! If you have any questions or need any more guidance on which Ruvi flavor you should try first, ask away in the comment section below.
Here’s to making food better, cleaner, and more wholesome for ourselves and our families! It just feels good, right?!
If you have any other store-bought foods you’d like to see get a healthy makeover, let me know! I love a good challenge!
Enjoy the yogurt tubes!
MORE RECIPES USING HOMEMADE YOGURT
- Instant Pot Carrot Cake Oatmeal with Cream Cheese Yogurt Sauce
- Yogurt Pickle Sauce for Instant Pot Chicken Ricotta Meatballs
- Yogurt Raita for Instant Pot Chicken Tikka Masala
- Lemon Yogurt Sauce for Instant Pot White Chocolate Lemon Cheesecake
- Yogurt topping for Instant Pot Fruit Soup
TOOLS/INGREDIENTS USED TO MAKE HOMEMADE FROZEN YOGURT TUBES
- Instant Pot
- RUVI Freeze-Dried Fruit and Vegetable Packs
- Silicone Tubes
- Disposable Plastic Tubes
- Funnel
Homemade Frozen Yogurt Tubes
Healthy, homemade naturally sweetened Frozen Yogurt Tubes
- Prep Time: 5 minutes
- Cook Time: 0 minutes
- Total Time: 15 minutes
- Yield: 8 tubes 1x
- Category: Snack
- Method: Mixer
- Cuisine: American
Ingredients
- 2 cups plain yogurt (homemade, regular, or greek)
- 2-4 tablespoons of sweetener, preferably maple syrup, but sugar, agave, or honey will also work
- 1 (0.8) oz package of RUVI (see notes)
Instructions
- In a medium-size bowl, mix yogurt, sweetener, and RUVI.
- Pour mixture into reusable or disposable pouches or molds (I do about ¼ – ⅓ cup in the disposable pouches, which makes 7-8 tubes). Freeze until firm, about 6 hours.
Notes
- Yogurt tubes are best when eaten frozen, but they can be stored in the fridge and be eaten cold as well.
- From my experience, young toddlers are happy with the yogurt unsweetened or with only 2 tablespoons. Kids (or adults) that are used to Gogurts and other store-bought yogurt tubes prefer them sweetened with 3-4 tablespoons of sweetener.
- RUVI is a powdered form of freeze dried fruit and vegetables. They come in 4 different flavors. Our favorites are Orange (tastes like banana mango) and Purple (tastes like blueberry grape). See more details about RUVI in the blog post.
- Plain yogurt (vs greek) isn’t as thick, which makes it much easier to pour into the tubes. I prefer to use my homemade Instant Pot yogurt. When I make yogurt, I only strain it for about an hour so it’s about the thickness of plain yogurt.
- My favorite way to get the yogurt into tubes is to use a funnel. I scoop about ¼ – ⅓ cup of yogurt into the funnel, then tap the funnel to help the yogurt fall into the tube. This makes it a pretty clean, easy job.


dear marci
i have tried your frozen yogurt for my grand kids. the problem i have is ruvi seems to clump. i have had to put it in the blender. do you have any suggestions on a better way to get the nice blend you seem to get?
Shelley, I’ve just been using a whisk, but I think throwing them in the blender would work great to get it really smooth.