


Instant Pot Chicken Fajitas are perfectly spiced without being spicy, brightened with lime, and served on a warm tortilla with piles of peppers and onions. This meal is so easy that you can throw it in the pot and have dinner in less than 30 minutes!
Turn this meal into a freezer meal! Find this recipe in our new Freezer Meal cookbook. CLICK HERE

Every now and again, a recipe comes along that really blows you away.
It has you hiding leftovers, thinking about it before you go to sleep, and putting it on your weekly menu plan for the next 8 months.
These Chicken Fajitas are that recipe.
The flavor infused into the chicken and peppers via the magic of the Instant Pot is so tasty that I have yet to have a restaurant version compare.
This meal is also a family favorite because I lay out all the toppings, and everyone has fun making it their way.
While the kids tend to go with chicken and cheese, I encourage you to make it the BEST way (my way).
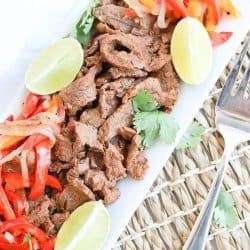
Soft, warm corn tortilla, topped with fajita chicken and a big scoop of peppers and onions, then dolloped with guacamole, sour cream, and salsa. Bring napkins or wear a shirt you don’t care about because you’re about to get drippage down your face and arms, and you’re gonna be too happy stuffing your face to care.
That’s how it’s done.

WHY YOU WILL LOVE INSTANT POT CHICKEN FAJITAS
- FLAVOR-TOWN: Both the chicken AND the peppers/onions get cooked in this incredible liquid gold! Tangy lime, fajita spices, and liquid smoke (which makes everything taste amazing).
- EASY: Fajitas aren’t typically an easy, one-pot meal, but today they are! Cook the chicken first, then throw the peppers in next.
- PERFECT WEEKNIGHT OR PARTY FOOD: Whether you want to treat yourself on a Tuesday or invite some friends and family over for a Sunday fajita spread, this is the perfect meal.
HOW TO MAKE CHICKEN FAJITAS IN THE PRESSURE COOKER
- Cook chicken in the flavor spice mixture
- When chicken is done, set it aside, then pressure cook the peppers and onions

SEE RECIPE CARD BELOW FOR DETAILED COOKING INSTRUCTIONS
TIPS FOR SUCCESS
- CHICKEN FIRST, THEN VEGGIES: I tried cooking the chicken and veggies at the same time . . . fail. The peppers were mush and I don’t like mushy peppers. For best results, cook the chicken first, then set it aside and throw the peppers and onions into the pot for 2 minutes. It’s already hot, so it will come up to pressure in no time!
- TORTILLA TRICK: Warm tortillas just make fajitas better, and if you’re using corn tortillas, they must be warm to prevent cracking. Wrap about 10 tortillas in a foil packet (you can make several packets if needed) and set them inside the oven at 250°F for about 10 minutes.
- BRING ON THE SIDES: Elevate chicken fajitas to the next level with just a few extra sides! My favorites are guacamole, sour cream, salsa, cilantro, and a few lime wedges. Feeling ambitious? A side of these Black Beans makes you feel like you’re sitting fancy at a Chili’s restaurant.
HOW TO STORE, REHEAT, AND FREEZE
- STORE: Cool, then store in the fridge in a sealed container. The chicken and peppers/onions can be stored separately if you like.
- REHEAT: Reheat gently in the microwave or in a sauté pan on the stovetop. Be careful not to cook it too long so the chicken doesn’t dry out.
- FREEZE: Place the chicken and peppers in a ziptop container and freeze for up to 3 months. When ready to eat, let it thaw in the fridge overnight, then reheat as directed above.

MAKE AHEAD TIPS
Chicken and cooking liquid can be mixed earlier in the day. I like to mix it in the pot and then set the pot in the fridge until I’m ready to cook.
Slice peppers and onions a couple of days in advance and store in a sealed container in the fridge.
WHAT TO SERVE WITH FAJITAS
VARIATIONS
- STEAK FAJITAS: If you prefer beef over chicken, here is a Steak Fajita recipe.
- QUESADILLA OR BURRITO: The chicken and peppers make a delicious quesadilla, burrito, or burrito bowl.
This is going down as one of the top favorites ever at my home! Try this one soon and drop me a comment below to let me know how it went.
Enjoy!

MORE INSTANT POT MEXICAN RECIPES
TOOLS/INGREDIENTS USED
PrintThe BEST Chicken Fajitas | Instant Pot Recipe

The BEST Chicken Fajitas! Chicken, peppers, and onions cook in one pot making this a super easy, flavorful meal.
- Prep Time: 15 minutes
- Cook Time: 12 minutes
- Total Time: 30 minutes
- Yield: 6 servings 1x
- Category: Entree
- Method: Pressure Cooker
- Cuisine: Mexican
Ingredients
For the Chicken
- Juice of 1 medium lime
- 1 Tablespoon white vinegar
- 2 Tablespoons low sodium soy sauce
- 1 teaspoon liquid smoke
- 1 teaspoon salt
- 1 teaspoon chili powder
- ½ teaspoon cayenne pepper
- ¼ teaspoon onion powder
- ¼ teaspoon black pepper
- 2 pounds boneless skinless chicken breast or tenderloins – if the chicken breast is thick, pound to about ½ inch thickness
For the Peppers and Onions
- 3 bell peppers (I like a combo of red, yellow, and orange), thinly sliced
- 1 sweet or yellow onion, very thinly sliced
For Serving:
- Fajita size flour or corn tortillas, guacamole, sour cream or Greek yogurt, salsa or pico de gallo, sliced jalapeños, cilantro, lime wedges, etc.
Instructions
- Place the chicken ingredients in the pressure cooker pot. Arrange the chicken so it is in a flat layer on the bottom of the pot as much as possible.
- Secure the lid and turn pressure release knob to a sealed position. Cook at high pressure for 12 minutes.
- When cooking is complete, use a 10 minute natural release, then release any remaining pressure.
- Set chicken on a plate and shred or slice into strips. Drizzle with some of the juices from the pot.
- Place peppers and onions into the pot and toss in the juices. Secure the lid and turn pressure release knob to a sealed position. Cook at high pressure for 2 minutes.
- When cooking is complete, use a quick release.
- To serve, place a few slices of chicken on a warm tortilla, top with peppers, onions, and other desired toppings like guacamole, sour cream, and salsa.
Notes
To warm several tortillas at a time, I wrap them in tin foil and place them in a 250°F oven for about 10 minutes. Keep them wrapped until ready to serve.


Leave a Comment